Mailchimp Email Templates: How To Build Beautiful Emails With The New Builder

You know that little monkey logo, right? The winking chimp in the cap?
If you’ve spent over five minutes in email marketing, you know we are talking about Mailchimp. This veteran email marketing tool has been the steady ally of marketers everywhere.
We adore this intuitive tool for designing professional-quality and responsive Mailchimp email templates. The new builder offers a simplified, more modern experience for creating email campaigns that boost engagement.
Along with the design capabilities, advanced functionality, and integration are also bundled together so that you can get cutting-edge email campaigns out of the door quickly.
So, let’s understand how to design Mailchimp templates with help of the new builder.
What’s New in Mailchimp New Email Builder
The new Mailchimp email builder is a built-in tool for easy email creation. It is fast and powerful, yet sports a clean and user-friendly interface.
Pretty much all you need to build your Mailchimp email marketing templates is here. Start with existing template options and customize by combining various content elements to match your brand’s needs. Or customize templates by adding your own email copy, images, and brand logo. Or do both depending on your email campaign’s time, resources, and urgency.
Just so you know, the new email builder is an upgraded avatar of the classic builder. Only more intuitive and flexible than the classic one.
Both editors sport drag-and-drop features and pre-designed Mailchimp templates to give you a head start. But what makes the new builder interface more refined and simpler? Its real-time undo/redo capabilities and inline editing. Made a mistake? Changed your mind about that heading? Easy fix. You can edit templates with the new builder and it is pretty fuss free.
You’ll also find versatile content blocks, the Content Optimizer (which gives suggestions while you work), Survey Blocks (because who doesn’t need feedback?), and better third-party integrations.
But hold onto your vintage hat—the classic builder still has exclusive tricks up its sleeve. If you need custom coding or want to embed an RSS feed, you must temporarily switch back to the classic builder. Which only takes a few clicks.
What Are The Template Options In The New Builder
The new Mailchimp builder has a great blend of templates to help you quickly kick off your email design.
-
Pre-designed Mailchimp Templates
These professionally designed templates are filterable by purpose (newsletter, promotion, announcement), industry (retail, nonprofit, tech), and plan level. Use them as professionally designed starting points to build your email designs.
-
Saved Email Templates
Previously saved email designs appear under this category of templates. They are meant to be reused for upcoming email campaigns.
-
Recently Sent Emails
Exact duplicates of emails you’ve already sent. Perfect for series emails or when you want to maintain consistent formatting without rebuilding from the ground up.
-
Drafts
These are unfinished Mailchimp email templates that you started working on but didn’t send. Continue working on them whenever you want. Because sometimes inspiration strikes at 2 AM, but execution needs to wait until after coffee.
Step-by-Step: Creating a Beautiful Mailchimp Email Template With the New Builder
-
Switch To The New Builder
- Sign into your Mailchimp account.
- Click your profile icon and select “Profile“
- Navigate to Settings > Details
- Scroll down to “Default Email Builder”
- Change the selection from Classic Builder to New Builder
- Hit Save to apply the changes.
-
Create a New Email
- Click Create, choose Email, and select Regular Email to get started.
- Fill out your campaign info.
- Click Design Email.
-
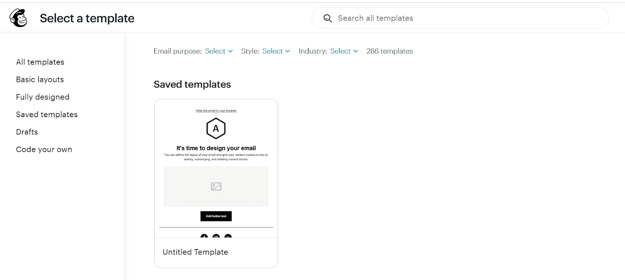
Select a Template
Once you create a campaign, the next step would be to select the type of template from the options given. What you see depends on your plan—free users can access “Start from Scratch,” “Custom Design Email,” and basic templates.
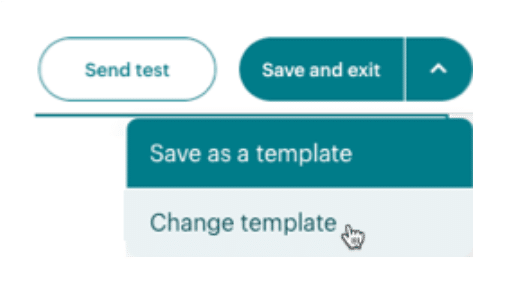
Quick tip: It’s not that there is no going back. You’re free to change your email template. Even after you’ve started building it. Find the tab that says Save and exit menu. Then, select Change template from the dropdown.
-
Choose Email Styles
Now that you’ve selected a Mailchimp email template, it’s time to customize default style settings for desktop and mobile. You will do it separately for both devices.
This is an essential step for creating consistent and responsive Mailchimp templates. The style features to do this are housed under the Styles panel.
For Desktop:
- Background & Body Colors: Set the default background and body colors. Inserting a background image is another feature that gives your template some more personality.
- Text: Adjust default font, size, color, line height, letter spacing, paragraph spacing, and direction for paragraph text and headings.
- Links: Choose default link color and style.
- Buttons: Define default button color, shape, and font.
- Dividers: Choose divider height, width, color, and style.
For Mobile:
- Adjust email padding for mobile readability.
- Set default text formatting, line, and paragraph spacing.
- Choose sizes and fonts for mobile buttons and dividers.
Important>> These styling options will reflect in the entire email. You can still override them at the section or content block level as needed.

-
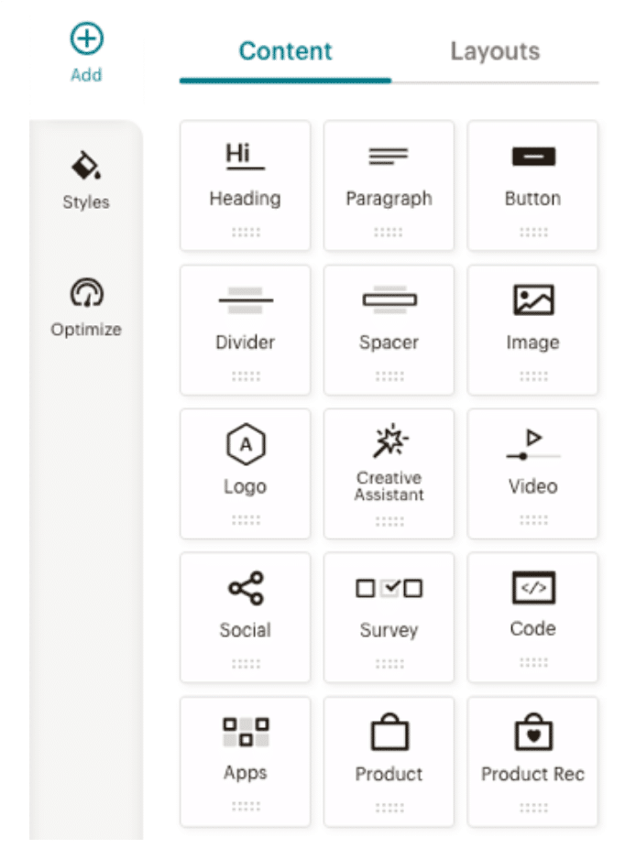
Add Content Blocks
Content blocks are like part of the skeleton required to build an email template. They allow you to add and arrange various types of content—text, images, buttons, social links, unsubscribe links, and more.
To add a content block:
- Click Add to open the Content tab.
- Drag a content block and drop it into your email layout.
- Select a block to open its editing options. Here, you customize the text, formatting, and style as per your branding guidelines.
-
Add Layouts
Layouts help structure your email into rows and columns for better visual flow. You can choose between:
- Blank Layouts: Empty columned sections ready for content.
- Prebuilt Layouts: Pre-configured combinations of text and image blocks—such as Image & Text, Text & Text.
To add a layout:
- Hit the Add tab. Choose the suitable option from the Layouts.
- Drag the desired layout into your design.
- Fill each column with your chosen content blocks.
-
Customize Styles for Sections and Blocks
Mailchimp’s New Builder gives you three levels of styling control. Here’s how to fine-tune different elements:
- Section Styles: Each template is divided into sections (header, body, footer). Styling a section applies those styles to all content blocks within it.
- Content Block Styles: If you want a specific block to stand out, click it and adjust its style. These settings apply to just that specific block.
- Editor Toolbar: For fine-tuned control (especially for text), use the editor toolbar to adjust formatting line-by-line. These changes take priority over block and section styles.
You can rearrange, copy, or remove any blocks and layouts as needed.
-
Review Suggestions with the Optimize Panel
As you build, Mailchimp’s New Builder will automatically review your content and design and flag issues. Think broken links, merge tag errors, image loading problems, etc.
If Mailchimp spots something, you’ll see an exclamation point icon. Click it for suggestions, or check the Optimize panel for a full summary of issues.
-
Undo, Redo, and Save
Mistakes happen! The new Mailchimp builder makes it easy to try out different design options without worry:
- Hit the undo icon to revert your most recent change.
- Hit the redo icon to restore an action you previously reversed.
Once you the email design looks good beyond any changes,
- Click Save and Exit
- You’ll return to the campaign checklist where you can finalize settings like audience, subject line, and send time.
I love your creation so much. Do you want to use it again? Save it as a custom template and use it across different Mailchimp accounts or future campaigns.
-
Preview and Test Your Mailchimp Template
Before launching your campaign, preview and test the Mailchimp email template with built-in tools.
- Preview Mode: See how your email will appear on both desktop and mobile devices.
- Send Test Email: Email a test version to yourself or team members.
- Inbox Preview: It’s a paid feature. Test email renderability across email clients.
Limitations of Mailchimp Email Templates
Mailchimp email templates shine when your needs are straightforward and your timeline is tight. The new builder makes creating decent-looking emails without technical skills easier than ever.
But let’s be honest about the limitations:
Customization only goes so far. If your brand has specific visual requirements, you might be frustrated by what you can’t change. While the templates are well-made, they’re generic and do not reflect your brand’s individuality. DIY editors rely on predefined templates; there’s limited flexibility in creating standout designs.
This is when investing in coding custom Mailchimp email templates makes sense. They let brands fully control their messaging, ensure error-free performance, and maintain a high branding standard across all email campaigns. So, for brands that depend heavily on email marketing, custom email development is worthwhile.
Not that custom email development is devoid of challenges. Custom email templates that are complicated or under-optimized can face issues in rendering.
For startups and small businesses, the built-in templates are a perfectly good starting point. But as your business grows, investing in custom email development becomes increasingly worthwhile, whether that means hiring a specialized email template service or bringing the expertise in-house.
Final Words
Mailchimp email templates and a seasoned email designer can be a powerful combo to communicate your products and services to the world most effectively. Using them to reach out to your subscribers can help you engage and convert them.
So go forth and create. That little monkey is rooting for you.